Wood Siding Repair Contractors Near Me
Wood siding repair contractors near me: Finding the right pro to fix your weathered wood siding can feel overwhelming. But don’t worry, this guide breaks down everything you need to know, from identifying the damage to choosing the perfect contractor and getting the job done right. We’ll cover common problems, cost estimates, and maintenance tips to keep your siding looking great for years to come.
This guide will walk you through assessing your siding’s condition, finding reputable contractors, understanding the repair process, budgeting for the project, and finally, maintaining your siding to prevent future problems. We’ll cover everything from minor repairs to more extensive projects, helping you navigate the entire process with confidence.
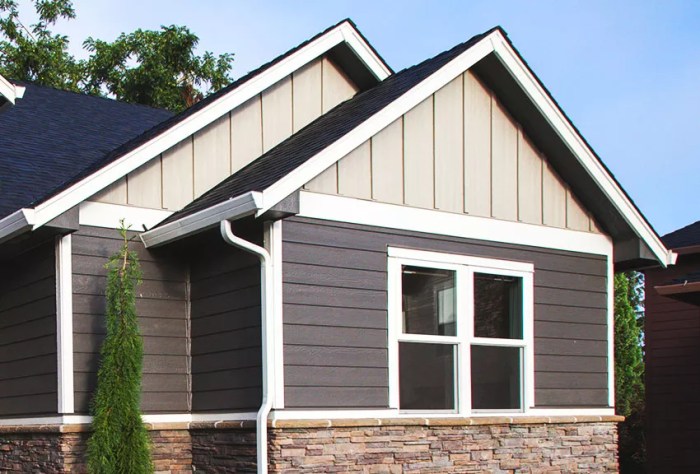
Understanding Wood Siding Repair Needs

Source: windows.net
Repairing wood siding can seem daunting, but understanding the common problems and cost factors can make the process much smoother. This section will guide you through assessing the damage and choosing the right repair approach.
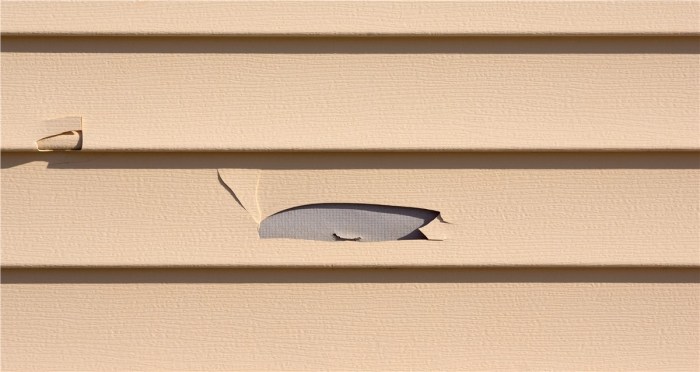
Common Types of Wood Siding Damage
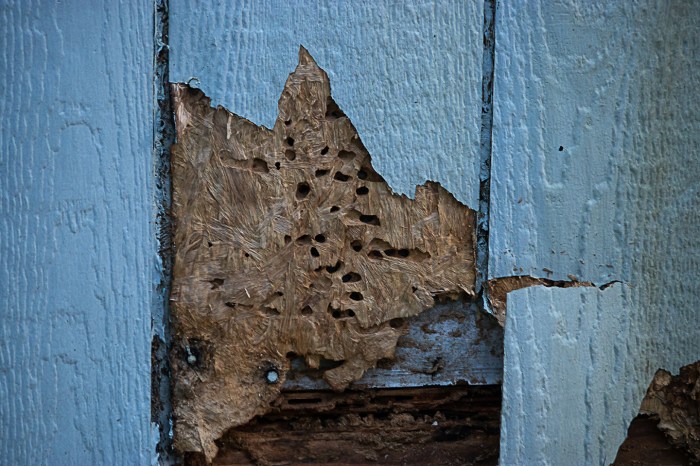
Wood siding, while beautiful, is susceptible to various types of damage. Common issues include rot, caused by moisture intrusion; insect infestation, often from termites or carpenter ants; cracks and splits, resulting from weathering and expansion/contraction; and damage from impact, such as from falling branches or hail. Water damage, in particular, can lead to significant structural issues if left unaddressed. Additionally, sun exposure can cause fading and discoloration over time, potentially requiring repainting or staining.
Factors Influencing the Cost of Wood Siding Repair
Several factors significantly impact the overall cost of wood siding repair. The extent of the damage is paramount; a small crack is far cheaper to fix than extensive rot requiring board replacement. The type of wood used also plays a role; repairing more expensive or rare wood species will naturally be more costly. Labor costs vary depending on location and the contractor’s experience. Material costs fluctuate with market prices for lumber and other necessary supplies. Finally, accessibility – how easily the damaged areas can be reached – impacts the time and effort involved, thus affecting the price. For example, repairing high-up siding on a two-story house will cost more than repairing siding on a single-story house at ground level.
Assessing the Extent of Damage to Wood Siding, Wood siding repair contractors near me
A thorough assessment is crucial for accurate repair planning and budgeting. Begin by visually inspecting the entire siding, noting any cracks, splits, rot, insect damage, or discoloration. Pay close attention to areas prone to moisture accumulation, such as near the ground, around windows and doors, and in shaded areas. Use a screwdriver or similar tool to gently probe any suspicious areas; soft or spongy wood indicates rot. For significant damage, you may need to remove some siding to assess the underlying structure. Photographing the damage provides a record for the contractor and helps in obtaining accurate quotes.
Comparison of Wood Siding Materials and Susceptibility to Damage
The choice of wood siding material affects its durability and susceptibility to damage. Different species possess varying resistance to rot, insect infestation, and weathering.
| Wood Type | Rot Resistance | Insect Resistance | Weathering Resistance |
|---|---|---|---|
| Cedar | High | High | High |
| Redwood | High | High | High |
| Pine | Medium | Medium | Medium |
| Fir | Medium | Medium | Medium |
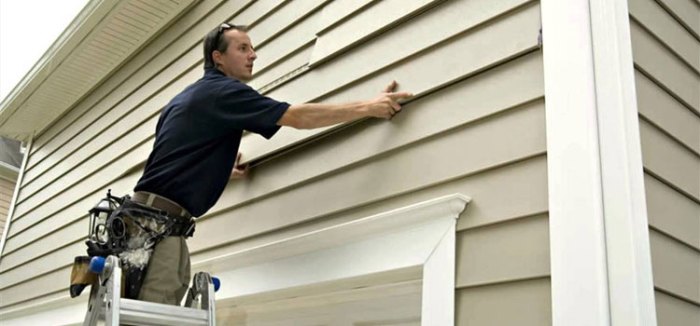
Finding and Vetting Contractors
Source: allseasonssiding.com
Finding the right contractor for your wood siding repair is crucial for a successful project. A thorough vetting process will save you time, money, and potential headaches down the line. This section Artikels key steps to help you find and select a qualified and reliable professional.
Contractor Selection Criteria
Choosing a contractor involves more than just the lowest price. Consider these crucial factors when comparing potential candidates: Years of experience, specialization in wood siding repair, positive customer reviews and testimonials, a valid license and insurance, and a detailed, itemized proposal. Don’t hesitate to prioritize quality workmanship over the cheapest bid. A poorly executed repair can cost you far more in the long run.
Verifying Contractor Licenses and Insurance
Always verify a contractor’s license and insurance coverage before hiring them. This protects you from potential liabilities if something goes wrong during the project. Contact your state’s licensing board to confirm the contractor’s license is valid and up-to-date. Request proof of general liability and workers’ compensation insurance. This ensures that you’re protected from financial responsibility in case of accidents or injuries on your property. Insurance details should be clearly stated in their contract.
Obtaining Multiple Quotes
Getting at least three quotes from different contractors is a best practice. This allows you to compare pricing, services offered, and overall value. Be sure to provide each contractor with the same detailed description of the work needed, including photos if possible. This ensures a fair comparison. Avoid choosing a contractor solely based on the lowest price; consider the overall package, including experience, reputation, and warranty.
Contractor Interview Checklist
Before committing to a contractor, conduct a thorough interview. Use this checklist to assess their competency and professionalism:
- Review their experience and past projects – Ask for references and contact them to inquire about their experiences with the contractor.
- Examine their license and insurance documentation – Ensure everything is current and valid.
- Discuss the project timeline and payment schedule – Understand the process and payment milestones.
- Inquire about their warranty and guarantee – Know what’s covered in case of problems.
- Ask about their cleanup procedures – A professional contractor will leave your property clean and tidy.
- Assess their communication skills – Good communication is essential for a smooth project.
- Obtain a detailed, written contract – This should Articulate the scope of work, payment terms, and timelines.
Remember, a well-structured interview will help you identify the best fit for your project.
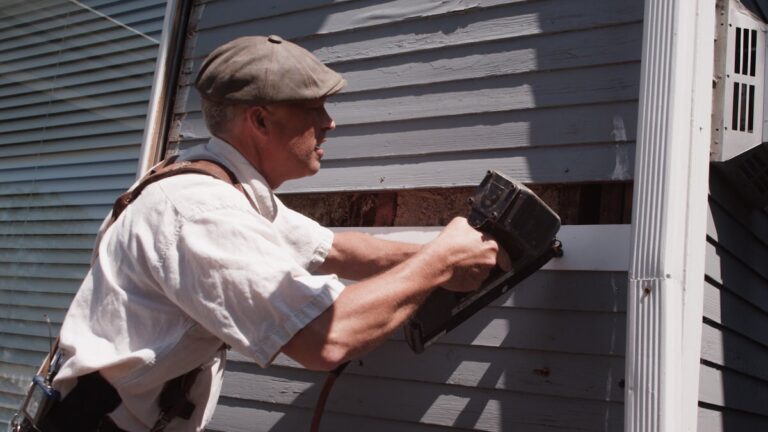
The Repair Process
Wood siding repair isn’t a one-size-fits-all job. The process depends heavily on the type and extent of the damage. A small crack is a far cry from extensive rot, requiring different approaches and materials. Let’s break down the typical steps involved, from initial assessment to a sparkling clean finish.
A successful repair begins with a thorough inspection. The contractor should identify all damaged areas, assess the severity of the damage, and determine the best course of action. This involves checking for rot, cracks, insect infestation, and loose or missing siding. They’ll also consider the overall condition of the siding and its compatibility with different repair methods.
Repair Techniques for Various Damage Types
Different types of damage require different repair techniques. Rot, for example, necessitates removal of the affected wood and replacement with new, properly treated lumber. Cracks, depending on their size, might be repaired with wood filler, epoxy, or even small wood patches. Insect damage often requires treating the affected area with insecticide and then repairing the damaged wood. Loose siding might just need to be re-nailed or rescrewed, possibly with additional support added. For extensive damage, section replacement may be necessary.
Materials Commonly Used in Wood Siding Repairs
Several materials are crucial for effective wood siding repairs. Wood fillers are used to fill small cracks and holes, matching the existing wood as closely as possible. Epoxy is a stronger option for larger cracks or damaged areas. Wood stains and sealants are essential for protecting repaired areas from the elements and maintaining a consistent look. New siding boards, cut to size, are needed for replacing severely damaged sections. Appropriate fasteners, like galvanized nails or screws, ensure the longevity of the repair. Caulk is also used to seal gaps and cracks, preventing moisture intrusion.
Step-by-Step Guide for Homeowner Preparation
Before the contractor arrives, homeowners can take several steps to streamline the repair process. First, clear the area around the house where the work will be done. This includes removing any plants, furniture, or other obstacles that could interfere with the contractor’s access. Next, trim back any overgrown vegetation near the siding to ensure easy access to the damaged areas. If possible, cover nearby landscaping or other features that might be vulnerable to debris or damage during the repair process. Finally, inform your neighbors about the upcoming work. This is a courtesy and may also help prevent misunderstandings.
The Repair Process: A Typical Sequence
The typical repair process usually follows these steps:
- Initial Assessment and Consultation: The contractor inspects the siding and discusses the repair options with the homeowner.
- Preparation: The area is prepared, including clearing debris and protecting surrounding areas.
- Damage Repair: Damaged sections are repaired using appropriate techniques and materials. This may involve replacing rotted wood, filling cracks, or treating insect damage.
- Finishing: The repaired areas are finished with wood filler, stain, and sealant to match the existing siding.
- Cleanup: All debris is removed, and the work area is cleaned.
Cost and Budgeting
Source: windows.net
Planning for wood siding repair can feel overwhelming, but understanding the cost factors involved will help you prepare a realistic budget. Costs vary widely depending on the extent of the damage, the type of wood, and your location. Getting multiple quotes from reputable contractors is crucial for comparison and informed decision-making.
Cost ranges for wood siding repairs are highly variable. A small repair, like replacing a few damaged boards, might cost between $200 and $800, while more extensive projects involving significant rot repair, full-section replacement, or repainting could range from $2,000 to $15,000 or even more for large homes. These are broad estimates, and the actual cost will depend on several factors.
Factors Influencing Repair Costs
Several key factors significantly impact the final cost of your wood siding repair project. These include the size and scope of the repair, the type and condition of the existing siding, the accessibility of the affected area, labor rates in your region, and the cost of materials. For instance, repairing cedar siding is often more expensive than repairing less costly wood types due to material costs. Difficult-to-reach areas, such as high roofs or areas with dense landscaping, will also increase labor costs. Furthermore, the complexity of the damage, such as significant rot requiring extensive board replacement or structural repairs, will increase the overall project expense.
Sample Budget Breakdown
A typical wood siding repair project budget can be broken down into several key components. The following example represents a medium-sized project involving repairs to approximately 100 square feet of siding. Remember, these are estimates, and your actual costs may vary.
| Item | Cost |
|---|---|
| Labor (including assessment and cleanup) | $1,000 – $2,000 |
| Materials (wood, nails, sealant, paint) | $500 – $1,000 |
| Permits (if required) | $50 – $200 |
| Contingency (for unforeseen issues) | $200 – $400 |
Payment Options and Financing
Most contractors offer a variety of payment options to accommodate homeowners’ budgets. Common options include upfront deposits, progress payments tied to project milestones, and final payment upon project completion. Some contractors may offer payment plans, allowing you to spread the cost over several months. For larger projects, homeowners may consider financing options through home equity loans, personal loans, or credit cards. It’s crucial to discuss payment terms and financing options directly with the contractor before starting the project to avoid unexpected financial burdens. Always review contracts carefully before signing and ensure you understand all terms and conditions.
Maintaining Wood Siding
Keeping your wood siding in top shape isn’t just about aesthetics; it’s about protecting a significant investment and ensuring your home’s structural integrity. Regular maintenance prevents costly repairs down the line and helps maintain your home’s curb appeal. By following a simple preventative maintenance plan, you can significantly extend the life of your wood siding.
Preventative maintenance involves a combination of cleaning, protection, and regular inspections. This proactive approach is far more cost-effective than dealing with extensive damage later on. Let’s delve into the specifics of maintaining your wood siding.
Cleaning and Protecting Wood Siding
Proper cleaning and protection are crucial for preventing damage from the elements. Regular cleaning removes dirt, mildew, and other debris that can compromise the wood’s integrity. Protecting the wood with a high-quality sealant or stain creates a barrier against moisture, UV rays, and insect infestations. For cleaning, a solution of mild detergent and water, applied with a soft brush, is generally sufficient. Always rinse thoroughly afterward. For stubborn mildew, a bleach solution (mixed according to manufacturer instructions) can be effective, but be sure to test it in an inconspicuous area first. After cleaning, allow the siding to dry completely before applying a protective sealant or stain. Reapplication frequency depends on the product used and exposure to the elements; check the manufacturer’s instructions for guidance. A good quality exterior-grade paint or stain, applied every 3-5 years, will significantly improve the longevity of your siding.
Regular Inspections for Early Issue Detection
Regular inspections are key to catching minor problems before they become major headaches. Ideally, inspections should be performed twice a year – once in the spring and once in the fall. During these inspections, look for signs of damage such as cracks, rot, insect infestation (look for holes or sawdust), loose boards, or peeling paint. Pay close attention to areas prone to moisture damage, such as around windows, doors, and the foundation. Addressing minor issues promptly, such as replacing a damaged board or repairing a small crack, is far less expensive than dealing with extensive rot or insect damage later. Early detection can save you significant time and money in the long run.
Preventative Maintenance Schedule
Regular maintenance helps prolong the life of your wood siding and keeps your home looking its best. Here’s a suggested schedule, keeping seasonal considerations in mind:
- Spring Cleaning: Thoroughly clean the siding to remove winter debris and mildew. Inspect for any damage caused by winter weather.
- Spring/Summer Inspection: Check for signs of insect infestation, loose boards, or other damage. Address any minor issues promptly.
- Late Summer/Early Fall: Re-inspect the siding for any damage from summer storms or sun exposure. Consider re-staining or sealing as needed, following the manufacturer’s recommendations.
- Fall Cleaning: Remove leaves and debris that could accumulate over the winter months.
- Winter Inspection (optional): If you experience severe winter weather, a quick inspection for ice damage is recommended.
Following this schedule will help you maintain the beauty and longevity of your wood siding, minimizing the need for costly repairs in the future. Remember, preventative maintenance is a small investment that yields significant long-term returns.
Visual Examples of Repairs

Source: staticflickr.com
Repairing wood siding involves a variety of techniques depending on the type of damage. Understanding the specific issue and selecting the right materials and methods is key to a successful and long-lasting repair. Let’s look at some common scenarios.
Cedar Siding Rot Repair
Cedar, while beautiful, is susceptible to rot, especially in areas with poor drainage or prolonged moisture exposure. Imagine a section of cedar siding near the ground showing signs of soft, spongy wood and discoloration. This indicates rot. To repair this, you’ll first need to remove the affected area, cutting back to sound wood. This often requires a chisel and a utility knife for precise removal. The exposed area should be cleaned thoroughly to remove any loose debris and lingering decay. For the replacement, we’d use a plank of high-quality cedar wood, ideally pressure-treated to resist future rot. The new piece should be carefully sized and shaped to match the existing siding. We’d apply high-quality exterior wood glue to the back of the replacement piece before carefully inserting it into the opening. Finally, exterior-grade wood screws, countersunk, and painted to match, secure the new piece in place. A waterproof wood filler would then be used to fill any gaps and imperfections before painting or staining to match the surrounding siding. Using a quality exterior paint or stain is crucial for long-term protection against moisture.
Repairing Damaged Siding Around Windows and Doors
Areas around windows and doors are particularly vulnerable to damage from water intrusion and weathering. Consider a scenario where the wood siding around a window frame has begun to crack and separate. The repair process here starts with a careful assessment of the damage. Loose or damaged wood needs to be removed. Any damaged caulking around the window frame should be removed and replaced with high-quality exterior-grade caulking. For the damaged siding, we would again use matching cedar or a suitable replacement wood. The new piece would be carefully cut and fitted, ensuring a tight seal against the window frame. Exterior wood glue and screws are used to secure the new piece, followed by the application of wood filler and paint or stain. The process is similar for door frames, emphasizing the importance of ensuring a weathertight seal to prevent future damage. Pay attention to the caulking – it’s a critical element in protecting the area.
Repairing Insect Damage in Wood Siding
Insect infestation, often from carpenter ants or termites, can cause significant damage to wood siding. Let’s say you notice small holes or tunnels in your siding, along with sawdust-like material. This is a clear sign of insect activity. The first step is to identify the type of insect and determine the extent of the damage. You may need to consult with a pest control professional for severe infestations. For minor damage, you can repair the affected areas by removing the infested wood, treating the surrounding area with an insecticide, and replacing the damaged sections with new wood, as described in the previous examples. Prevention is key. Regular inspection of your siding, proper ventilation, and maintaining a dry environment can help prevent insect infestation. Treating the wood with a borate-based insecticide before installation can also act as a preventative measure.
Replacing a Damaged Section of Wood Siding
Sometimes, a section of siding is beyond repair and needs complete replacement. Picture a large area of siding that has suffered extensive damage from impact or severe rot. To replace this, you’ll need to carefully remove the damaged section, ensuring you don’t damage surrounding boards. This may involve removing nails or screws and carefully prying the siding away. The area should be cleaned thoroughly. The replacement section, cut to the exact size, will be installed, using exterior wood glue and screws. It’s crucial to match the profile and dimensions of the existing siding for a seamless repair. Caulking will seal any gaps, followed by painting or staining to match the existing siding. Using a quality wood filler to smooth out the transitions is important for a professional finish.
Final Wrap-Up: Wood Siding Repair Contractors Near Me
Repairing your wood siding doesn’t have to be a headache. By following the steps Artikel in this guide—from carefully assessing the damage and choosing a qualified contractor to understand the repair process and budgeting effectively—you can ensure a smooth and successful project. Remember regular maintenance is key to extending the life of your siding and avoiding costly repairs down the line. So get those quotes, pick your contractor, and get your siding looking its best!
Clarifying Questions
What kind of insurance should my contractor have?
At a minimum, your contractor should carry general liability insurance and workers’ compensation insurance. This protects you from financial responsibility if someone gets hurt or property is damaged during the repair process.
How long does a typical wood siding repair project take?
The duration varies significantly depending on the extent of the damage. Small repairs might take a day or two, while larger projects could take several weeks.
Can I get financing for wood siding repairs?
Yes, many contractors offer financing options, or you can explore home improvement loans through banks or credit unions. Always compare interest rates and terms.
What’s the best way to clean wood siding?
Use a soft brush and a solution of mild detergent and water. Avoid high-pressure washers, which can damage the wood. Rinse thoroughly and allow to dry completely.
How often should I inspect my wood siding?
Ideally, inspect your siding twice a year, once in spring and once in fall, to catch minor issues before they become major problems.